
How redemption works in the shop
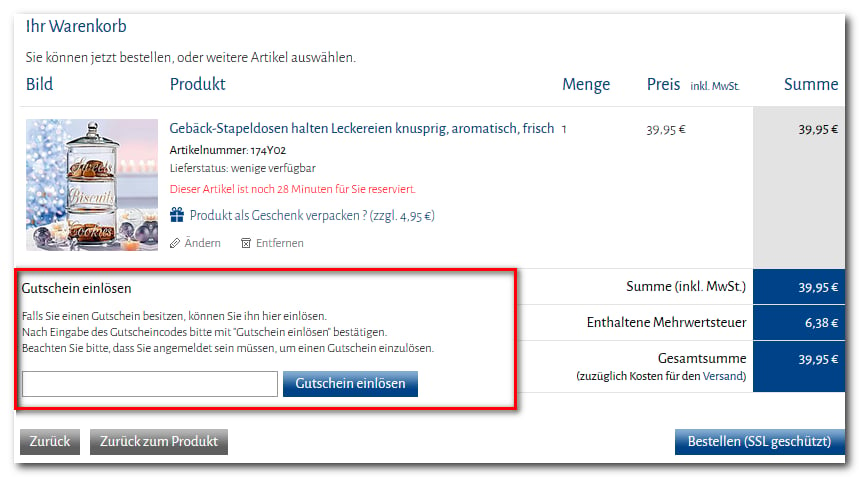
ws_basket.htm, on the order overview page ws_place_order.htm, or on both.
After a successful check, the customer immediately sees the savings or the added product. Offer a “Remove voucher” button afterwards as well, so that the customer can keep the voucher for a later order.
If someone tries to redeem a personalized voucher without logging in, a login form can be displayed within the error message. After logging in, the buyer can be automatically redirected back to the basket page to enter the voucher again.
Passing voucher numbers via link
A voucher number can already be passed in the URL parametervoucher_number when the shop is called up, for example via a link from a newsletter. The shop then automatically enters it into the input field in the ordering process.
The parameter is introduced with
? if it is the first one in the address, and appended with & otherwise.Redeeming vouchers in brick-and-mortar retail
If you also run a physical store, you can print the voucher number as a barcode on the voucher and have it scanned at the checkout. The tagWS-BarcodeURL generates the barcode as an image.
The tag works on every template. Where you place it depends on which type of voucher you offer, i.e. whether on the purchase voucher for printing, in the newsletter voucher, or on the new customer voucher.
Integrating voucher entry
Step 1: Activation
If you want to use the voucher generator, it must be activated for your shop. Contact your WEBSALE representative to do so.If you use vouchers generated by an external system that are therefore not in WEBSALE format, add the entry
ExternalVouchers-Allow = yes in the <Voucher-Txt> section of the shop.config.Step 2: Settings in the shop configuration
All voucher parameters are located in the<Voucher-Txt> section of the shop.config.
VoucherInputLocation defines on which pages the shop expects voucher entry.
The entry is a comma-separated list, not a choice from three fixed keywords. If the shop does not recognize any of the values, it uses
Basket.Step 3: Placing the input field and buttons
The input field and the two buttons belong insideFORM-Basket or FORM-PlaceOrder respectively, because only then are they submitted with the form.
The two sections
{VOUCHER-Number} and {!VOUCHER-Number} are mutually exclusive. As long as no number is present, the customer sees the input field; afterwards, the entered number with the remove button. This way, both never appear on the page at the same time.ST-Voucher_checked indicates that the number has already been checked, ST-Voucher_OK that it is valid. Only both together allow the statement “checked and not valid”, which highlights the incorrect entry here.Step 4: Placing messages
You can freely place success and error messages on the same pages where you have built in the entry. Each message is a separate section with the reason as a parameter, so you have full control over wording and design.Several reasons lead to the same statement, for example 9 and 11, or 15, 17, and 19. The shop distinguishes them because different checks apply internally. The texts may be identical for the customer, but a separate section per reason is still required.
Step 5: Placing a removal link (optional)
In addition to the button, you can offer a link with which the customer can get rid of a valid voucher as long as the order has not been completed.Preventing order completion with non-applicable vouchers
By default, the customer may place an order even if their valid voucher has no effect on this order. This is intentional, because the customer then does not need an extra click to remove the voucher. This case occurs, for example, with a promotional voucher in a basket that contains only products not eligible for promotional vouchers, or with a category-dependent voucher when there is no product from that category in the basket.In some cases, explicit deletion by the customer still makes sense, for example if the voucher adds a product to the basket. The customer should then notice that they will not receive this product.
MSG-Voucher_error; see the table above.
Step 2: Set the following entry in the <Voucher-Txt> section of the shop.config.
Adjustment for voucher entry on the order overview page and minimum order value
You need this addition if both of the following apply to your shop:- The voucher number is entered exclusively on the order overview page
ws_place_order.htm. - The voucher discount at item level is taken into account for the minimum order value, controlled via
MinimumOrder-ConsiderVoucherDiscount-Allowin the<OrderConditions>section.
Taking it into account is the default setting. Only an explicit
MinimumOrder-ConsiderVoucherDiscount-Allow = no switches it off and adds the voucher discount at item level back to the calculation basis.ws_basket.htm.
The field is intentionally set to
disabled. The customer should be able to see and recognize the number but not change it on this page, because an entry here would have no effect.Related topics
- Guide: Offering vouchers: Overview
- Guide: Create or import vouchers
- Guide: Redeem multiple vouchers
- Reference: VOUCHER-