
This page only covers CSS. For JavaScript files a largely identical procedure applies, with its own folders and its own tags, described in the guide “JavaScript and jQuery”.
Folder structure
In the directory of your online shop you will find thetemplates folder, which contains all available templates as well as two folders for stylesheets:
css_upload folder. That is also where you edit and delete them. The css_min folder, on the other hand, is filled exclusively by the PageSpeed tool. All files it contains are minified and provided with URL fingerprinting. You do not edit these files yourself, because they are overwritten on the next publication.
If this folder structure does not yet exist in your shop, please create it accordingly. Without both folders the PageSpeed tool cannot work.
Creating a CSS file
Underbenutzer/templates/css_upload the sample shop already contains stylesheet files that you can use as templates. You add further files to the same folder with a simple SFTP client.
You are free in the naming, as long as you follow the HTML conventions for file names.
Source (external link): HTML conventions for file names
A split into two types of files has proven effective:
- a “base framework file” with all directives that are needed on every page
- several small files for directives that only concern a single template, for example the shopping cart
Including with the PageSpeed tool (recommended)
After you have provided your files via SFTP in thecss_upload folder, you assign them to the desired templates. We recommend the route via the PageSpeed tool, because it means your shop uses the minified files with URL fingerprinting rather than the unprocessed originals.
The route consists of three steps: activate the tool, group files, include the grouping in the template.
Only have non-minified file versions processed by the PageSpeed tool. Minifying an already minified file again can lead to errors.
Activate the PageSpeed tool
In the OSB “Configuration” service, the PageSpeed tool is visible by default and therefore active. If the tab is not present in your case, contact your WEBSALE contact. For the shop to actually access the generated files, an additional entry in the shop configurationshop.config is required. Activation by WEBSALE is not necessary for this, but the folder structure described above must be in place.
Add the parameter UseMinifiedCSSAndJS in the <TopRank> section:
Grouping CSS files
A CSS file can only be included via the PageSpeed tool if it is assigned to a grouping. The grouping is therefore the smallest unit that the shop later references. You create groupings in the Online Service Area (OSB) under the Configuration service. Choose the “PageSpeed tool” tab there and then the “CSS” tab. In the left column under the heading “Groupings” you create as many page- or topic-specific groupings as you like. Each grouping is given a freely chosen grouping ID when it is created. In the examples on this page, this ID isstart.
In the right column you see all CSS files that you have provided via SFTP in the css_upload folder. If a just-uploaded file is missing, click the refresh icon.
Drag and drop the required files inside the OSB into the respective grouping. Then click the globe icon to generate the files for the grouping. For each grouping ID, an optimized CSS file is created in the css_min folder. Each further click on the globe icon generates a new version, provided you have made content changes.
Including a grouping as an external CSS file
An external CSS file has one decisive advantage: it is used by several templates but only needs to be loaded once by the browser. For each grouping ID, the PageSpeed tool already generates such a file. You include it with thelink HTML element at any position in your template. The path is delivered by the WS-CSSURL() tag, in whose parentheses you specify the grouping ID.
Example: the start grouping is to be included in the <head> of the template.
753e2835a4 is the URL fingerprint. It changes with each new version of the grouping.
Reference: WS-CSSURL()
Including a grouping inline
Stylesheets do not have to be included via an external file. With thestyle HTML element you place them directly in the HTML document. This is the right approach if your CSS directives contain WEBSALE tags or text variables.
The content of all files of a grouping is delivered by the WS-CSSInline() tag, in whose parentheses you specify the grouping ID.
Example: the stylesheets of the start grouping are to be included inline inside the <body>.
Direct access during the design phase
When you include files via the PageSpeed tool, changes to CSS files only become visible after a click on the globe icon. When building a new shop, this intermediate step is time-consuming because it has to be repeated after every correction. For this case, there is direct access. Instead of the generated files in thecss_min folder, the shop accesses the original files in the css_upload folder that are assigned to the grouping. Changes are then visible immediately after upload and a browser reload.
Direct access consists of two parts. First, a setting in the shop configuration shop.config that determines when the mode applies. Second, a bracketing in the template that covers both cases.
Permanent direct access
With the following setting, the shop permanently accesses the original files. This setting is recommended while you are building a shop and making frequent changes.Direct access on demand only
With the valueno, permanent direct access is deactivated. The shop then only accesses the original files when you call it with the parameter &jscssdirect-test=on. With &jscssdirect-test=off it returns to the files in the css_min folder.
Example: external CSS file with direct access
With direct access, the shop delivers each file of the grouping individually, not a combined file. The template must therefore iterate over all files of the grouping. The bracketingWS-DirectCSS() with the grouping ID is used for this, and inside it the loop @WS-DirectCSS, which delivers the path of one file per iteration via WS-DirectCSSURL.
So that the template works in both states, the bracketing ST-DirectJSCSSTest encloses the direct access case and !ST-DirectJSCSSTest the normal case.
Example: the start grouping has the two files font.css and color.css assigned to it.
Example: inline inclusion with direct access
Inline-embedded stylesheets can also be used with direct access. Instead of the path,WS-DirectCSSInline here delivers the content of the respective file.
Example: the stylesheets of the start grouping are to be included inline inside the <body>.
Trying out new groupings in the design test mode
A new grouping does not have to be built into the live mode straight away. The bracketingST-DesignTest is available for all integration variants described. This way, only you see the new assignment in the design test mode, while visitors continue to receive the previous version.
Debug mode for troubleshooting in the browser
If the CSS directives do not take effect as intended, troubleshooting in a minified file is tedious. Therefore, you can suppress the inclusion of the minified file via a URL parameter and use the non-minified version in the browser instead. The PageSpeed tool stores this version in thecss_min folder at the same time as the minified file.
If you include your CSS files via direct access, you do not need this mode. The browser gets the non-minified originals there anyway.
To activate, append the parameter &jscssminified-test=off to any shop call. The shop must be in test mode for this.
.min in the file name:
&jscssminified-test=on you return to the minified files:
Including without the PageSpeed tool
Using the PageSpeed tool is not mandatory in WEBSALE V8s. You can also include CSS files in every template via a relative path or write stylesheets directly in the template. This route is simpler, but it does without minification and URL fingerprinting. When including via a relative path, thebase element must be considered. It defines the base for all relative references and usually points to the subshop template directory, for example benutzer/templates/Deutsch.
base element only matters if you include background images via background or background-image.
Notes on Bootstrap CSS
The filesbootstrap.css and bootstrap.min.css as well as bootstrap-theme.css and bootstrap-theme.min.css provided in the sample shop are the unmodified standard files from Bootstrap with all directives and components. Apart from the email templates, all sample shop templates already use bootstrap.min.css and bootstrap-theme.min.css.
If you want to adapt the sample shop to your design, use the customizing of Bootstrap for this primarily. We advise against changing the Bootstrap files delivered, because this will cause you to lose Bootstrap’s update and compatibility capabilities.
If a design adjustment cannot be solved via customizing, override the Bootstrap directives. Both routes described above are available for this: the external CSS file and inclusion directly in the source code.
Guide: Bootstrap
WEBSALE class names and IDs
All HTML elements generated automatically by WEBSALE V8s are given class names and IDs. One example is the paging navigation for product lists: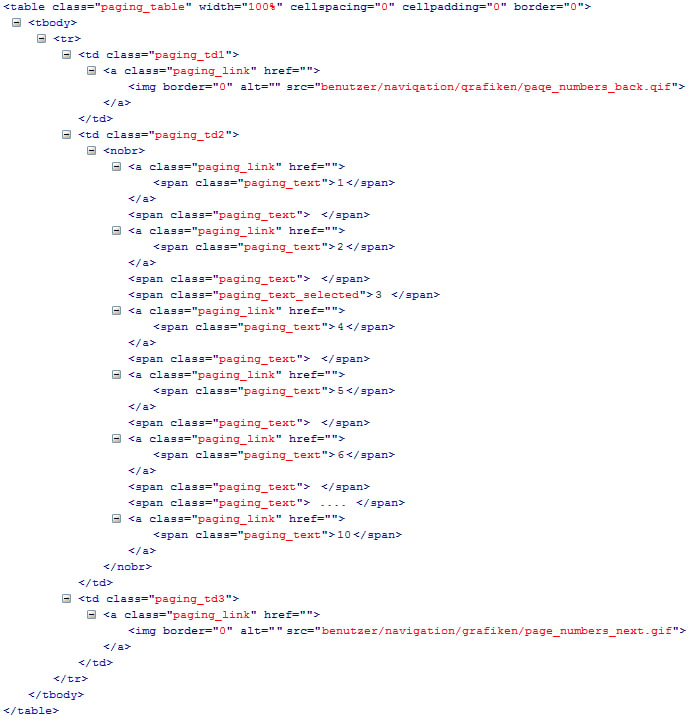
- Styles for products
- Styles for product ratings
- Styles for paging in categories and products
- Styles for the currency dropdown list
- Styles for login
- Styles for billing and different shipping addresses
- Styles for bank details
- Styles for multiple customer data
- Styles for Trusted Shops information
- Styles for wish list variants
- Styles for error messages in online clearing
- Styles for paid additional services
- Styles for storable shopping carts
- Styles for the WWS information data interface
- Styles for wish list
- Styles for consent to advertising
- Styles for product comparison
- Styles for filters at category level
SEO-optimized delivery of CSS files
The performance of a page is one of the most important criteria for a good search engine ranking. Because of their size, CSS files are particularly significant in this regard. The following sources explain how you can keep your design and still achieve good performance.- Optimize CSS delivery: Minify resources and Optimize CSS delivery
- Use browser caching
- URL fingerprinting and caching headers
- Prioritize visible content