
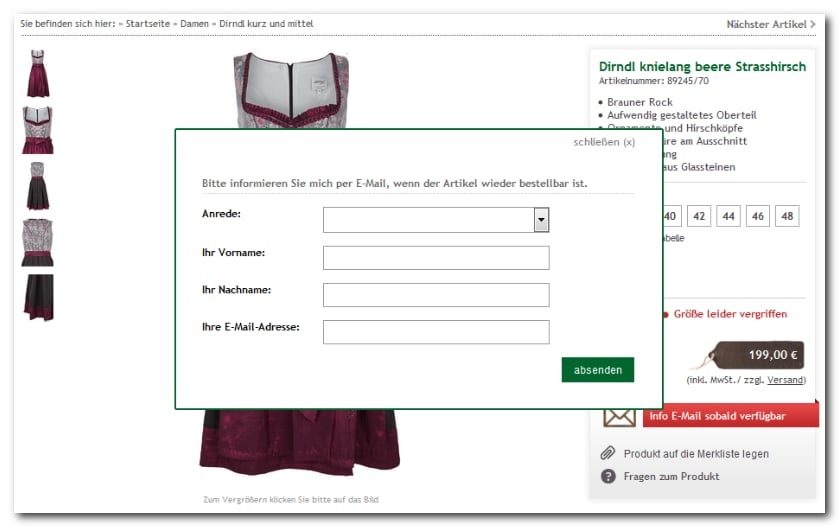
The feature was formerly called “OrderNow service”. The old name still appears in the technical identifiers, for example in the configuration section
<OrderNowMail>.When an email is sent
The email is not triggered by a schedule but by the improvement of the availability status compared to the moment of registration.No distinction is made between “red not orderable” (red-hard) and “red orderable” (red-soft). No email is therefore sent when switching from red-hard to red-soft.
Requirement
Dynamic stock management must be activated. Without it, the shop does not know an availability status whose change it could react to. Guide: Displaying stock levelsOverview of the building blocks
The function consists of three templates, one email, and two configuration sections. Get this overview first, then the integration steps fall into place on their own.
How the registration form appears is then up to your design. Possible options are a redirect to a dedicated shop page, a pop-up or layer, or a Bootstrap modal. The technical integration is the same in all three cases.
Step 1: Activate the service
In the shop configurationshop.config, set the Allow parameter to yes in the <OrderNowMail> section. If the section is missing, create it. It will later also contain the settings for the notification email.
Step 2: Set a minimum stock level (optional)
Without this specification, the shop sends the notification as soon as a single unit is available. With multiple registered buyers, the product is then immediately out of stock again. With a minimum stock level, you delay sending until enough goods are available. To do this, add theOrderableMailStockLimit-Value parameter to the <Inventory> section in the shop.config.
Step 3: Configure the email
Subject, sender, and the template to be used are also in the<OrderNowMail> section.
Step 4: Create the email template
Create a template under exactly the name that appears afterTemplate in the <OrderNowMail> section, and save it in the template directory of the respective sub-shop, for example under benutzer/templates/<Subshop>/.
Which tags are allowed
The content of automatically generated emails depends on which feature they originate from. The BackInStockMail comes from the OrderNow module, so exactly the data that this module supplies when sending is available. Other tags remain unreplaced in the text.The same tags are also replaced in the subject.
Subject-Txt = ~PR-Name~ ist wieder verfügbar is therefore possible.Adding your own parameters to the deep link
If you want to append your own parameters to~PR-DeepLink~, first add the optional parameters Referer and SubReferer in the <OrderNowMail> section.
ref= and subref= to the link. This guarantees that the link ends on a parameter, and you can attach further ones in the form ¶meter=value.
SubReferer only takes effect if Referer is also filled. If Referer is empty, the link remains unchanged.Step 5: Add the button to the product detail view
Using thePR-InventoryState() bracket, you control at which availability status the registration is offered. In the following example, the registration link appears at “red not orderable” (red-hard), and the regular shopping cart button in all other cases.
~PR-InventoryRegisterLink~ leads to the registration template from Step 7 and passes along the product.
Step 6: Assign the templates in the shop configuration
Two templates are assigned in the<Templates> section of the shop.config: one for the collection of the contact data, one for the confirmation.
Step 7: Collect the contact data
Create the template under the name that appears afterInventoryRegister.
The only mandatory field is the email address, because only it is needed for sending. All other fields are optional in accordance with the EU General Data Protection Regulation.
If the buyer is logged in and has thereby consented to the use of their data, the other fields are already pre-filled. If they subsequently register for another product, all fields are filled and they do not have to enter anything again.
You can additionally include product information. In the following example, product name and price appear above the form.
~MSG-InventoryRegister_Notify~ outputs the shop’s messages, for example when the email address is missing or invalid. Without this tag, a rejected registration remains inexplicable to the buyer.
The IR- tags come in pairs: ~IR-Fieldname_input~ provides the field name for the form, ~IR-Fieldname~ the value already entered.
Step 8: Confirm the registration
Create the template under the name that appears afterInventoryRegisterConfirm. No special tags are needed here, a confirming text is enough.
Step 9: Test the notification email
The test runs in two stages, because the display and the tag replacement are checked separately.Check the display
Open the email template in the browser to see whether the CSS rules take effect. To do this, append thetpl parameter with the template name to a sample product.
This call only shows the view. The tags are not replaced, and the link to the product cannot be clicked.
Check the function
Create a test product with the stock level for which you have integrated the service. Call it up, fill in the form, and then set the stock level to “green”. You will then receive the notification at the specified address, with replaced tags and an active product link.Show registered products in the shop
Optionally, you show the buyer a list of the products for which they have registered, along with the option to unsubscribe from individual notifications.Create the overview template
Create a template with any name, for examplews_inventory_register_overview.htm. An assignment in the shop.config is not necessary, the template is loaded via a link.
{CAT-AdvData($InventoryRegister,999)}returns the registrations as a product list, here up to 999 entries. The{@PR-Data}loop iterates through them.- The free parameter
DC-FPAdvDataremembers that the list had entries. Only in this way can a text be output below the list when it was empty, since the bracket itself is already closed at this point. ~PR-DeleteIRListEntry(...)~generates the unsubscribe link. As a parameter you specify the template to which the shop returns after deletion, in this case the overview itself.
{PR-SetParent} block is only needed for set products. It lists the contained sub-products.
Add a link to the overview
The obvious choice is the customer accountws_user_account.htm. Since a buyer does not have to be logged in to register, however, you can place the link anywhere.
Related topics
- Guide: Displaying stock levels
- Guide: Displaying dependent variants