
How it works
All functions that require consent following the ECJ ruling and that are located directly in the shop templates can be offered as a group or individually — a combination of both is also possible. Examples: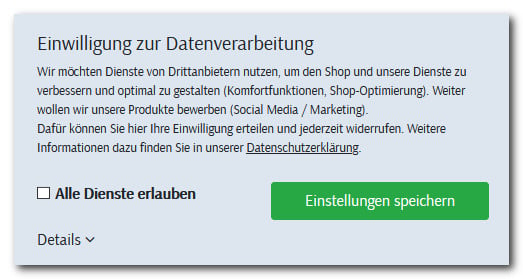
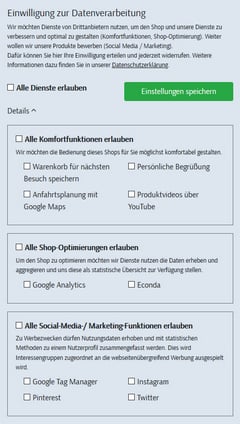
- summary buttons or checkboxes for all services
- checkboxes for groups of services from one or more providers
- an individual checkbox for each function
Notes on special cases
- By preventing tracking on the first call, the tracking data is cut off from important information, for example the origin of the shop visitor. Tracking therefore only transmits correct information over the course of a visit or on the next visit.
- If the shop visitor deletes the cookie of the declaration of intent given, either via the browser or using a tool, the banner appears again on the next shop page call, with the settings that currently still apply based on the possibly still existing opt-in and opt-out cookies of the individual functions.
- If a shop visitor withdraws consent to tracking, for technical reasons the cookies set by the third-party provider cannot be removed by WEBSALE. The processing of this data is prevented because the provider’s tracking scripts are no longer embedded.
- Cookies already set by WEBSALE are automatically deleted via JavaScript when consent is withdrawn.
- When an affiliate program is used, the collected data is passed on to WEBSALE but only processed after the shop visitor has given consent.
- When a cookie is to be deleted, the content of the cookie is removed by WEBSALE and the expiration date of the cookie is set to the past. Deletion of the cookie itself cannot be guaranteed, as this is handled by the shop customer’s browser.
Integration
Step 1: Activation
No technical activation by WEBSALE is required.Step 2: Configure services
In the shop configurationshop.config, create a new <AgreementCookies> section and configure the parameters as shown in the examples below.
Example 1, all functions listed individually, without grouping:
ConsentGroupID parameter is added in each <+Entry>, together with a <+ConsentGroupInfo> section for each group:
Step 3: Embed JavaScript
Embed the current version of the JavaScriptws-module-agreementcookies in version 1.8.5 or newer via the PageSpeed tool or in the <head> section of the desired template:
Step 4: Bracket services and functions
The bracket can be used to enclose inline scripts. The ID from the<+Entry> section is required for this:
Step 5: Adapt the tracking interface
If functions and services are embedded via the tracking interface, this must be integrated for consent via the PageSpeed tool. If this is not the case, then activating the consent to data processing feature means thatws_analyse.js is no longer embedded automatically.
If the tracking interface has been integrated via the PageSpeed tool, the following bracket usage is possible:
WS-ExternalStatistics tag is required, which contains the JavaScript block with the general and page-dependent tracking information in JavaScript variables. With this procedure, all functions and services that are embedded via ws_analyse.js are activated or deactivated with a single click.
If you want to offer the functions and services individually, ws_analyse.js must be broken up. Each function and each service must be outsourced as an individual JavaScript file and set up as an individual group via the PageSpeed tool:
Step 6: Show consent layer with checkboxes
To display a detail page with checkboxes for the shop customer to actively confirm consent, integrate the following code in the desired template. If necessary, the third-party services used still need to be supplemented accordingly. Example 1, all functions listed individually, without grouping:Step 7: Insert a button with a JavaScript function
Typically, the functionws_agreementcookies_set(); is placed on the Save button of the consent layer to set the cookies. Insert the following code into the consent layer.
Step 8: Change the lifetime of the agreement cookies (optional)
The lifetime of the agreement cookies is 10 years by default. Starting with the JavaScript module componentws-module-agreementcookies-1.8.6.js, the function ws_agreementcookies_set() can be supplemented with an expires_days parameter. Enter the desired number of days in the argument of the button’s onclick function.
Examples:
Step 9: Notice for outdated browser version (optional)
In outdated browser versions — for example Firefox up to version 52 — the consent to data processing feature is not executed correctly. The shop visitor can be made aware of this with an appropriate notice. To do this, embed the script described in the linked chapter. Guide: Notice for outdated browser versionStep 10: Going live
If you want to enable the function for live operation, set theAllow parameter to yes in the <AgreementCookies> section of the shop configuration shop.config:
Notes on migration
If you have already integrated the consent to data processing function in your shop and now want to switch to the current integration from November 2019, please note the following:- Update the JavaScript
ws-module-agreementcookiesto version 1.8.5 or newer, as shown in Step 3. - Assign the following
onclickattribute to the checkboxes for querying consent:onclick="ws_agreement_updatecheckboxes();"; see Step 6.
Simplified integration for econda services
If you use econda Tracking or econda ARP in your shop without the WEBSALE tracking interface, you can control the consent to data processing by econda directly via the consent layer without wrapping or unwrapping the complete file from econda. econda distinguishes between the following privacy modes:Further information and current code examples can be found in the econda documentation. A login is required.
Prerequisites
The integration of econda in your shop has been carried out without the WEBSALE tracking interface — that is, using the standard integration. In addition, the consent to data processing function, as described above, has been implemented in your shop. Guide: Integration of econda Tracking and econda ARPStep 1: Activation
This function does not need to be activated by WEBSALE.Step 2: Setting in the econda backend
Open your econda backend and select the desired privacy mode that is to be used by default there, that is, without a selection by the buyer.Step 3: Remove existing econda-related configurations and brackets
This step only applies if relevant. If consent to data processing by econda has already been integrated into your shop by bracketing the complete file from econda as described above, first remove all corresponding brackets and settings in your shop configurationshop.config.
Step 4: Adapt the consent layer
For econda Tracking, insert the following code on the consent layer (see Step 6 of the general integration):For econda ARP to be executed, the buyer must have selected privacy mode 3.
WEBSALE app for iOS (App Tracking Transparency)
Since operating system version iOS 14.5, Apple requires that the AppTrackingTransparency framework (ATT) be implemented in apps that track user data. Through the framework, the user is asked when opening the app for the first time whether they consent to tracking by the app or not. When using the iOS app, the WEBSALE consent layer is therefore no longer displayed. The AppTrackingTransparency framework sends the HTTP tracking status in the header to the WEBSALE app. In addition to Apple’s tracking status values, there is also the valuealways:
Further information can also be found in the Apple documentation.
These tracking status values must be inserted as a comma-separated list in the new parameter in order to activate the respective service, that is, the cookie and the associated
<+Entry> entry. If you use the WEBSALE app, supplement all individual <+Entry> entries in the <AgreementCookies> section of the shop configuration shop.config with the following parameter:
Examples
Add the following parameter-value pair to all<+Entry> sections whose tracking you only want to activate after explicit consent or on older iOS versions:
<+Entry> sections whose activation does not require explicit consent from the customer, for example when the data is not forwarded to external systems:
<+Entry> entry — at which tracking status transmitted by iOS the respective service is activated and a corresponding cookie is set. With the value always, you assume general consent from the user for this service, regardless of the value transmitted.
All essential cookies that are fundamentally necessary for the functionality of the shop are not affected and are not available for selection. This is the same as with the WEBSALE consent layer.